How to create an online store when you already have a Wordpress blog.

If you already have a WordPress blog, you’re off to a great start! But if you’re looking to sell products or services, adding an online store to your blog is a game changer. The good news is that using a simple online store builder alongside your WordPress blog can make this process seamless and hassle-free. Here's how to do it.

Why Use an Online Store Builder Instead of WordPress Plugins?
While WordPress offers various e-commerce plugins like WooCommerce, they can be overwhelming for beginners or bloggers who want a lightweight, straightforward solution. Online store builders provide:
- Ease of Use: No coding or technical expertise required.
- Speed: Set up your store in minutes.
- Affordability: Many platforms, like vendroad online store builder, start at just $7/month.
- Integration with WordPress: Use your WordPress blog for content marketing while your store handles the selling.
How to Set Up an Online Store with Your WordPress Blog
Step 1: Choose an Online Store Builder
Select an online store builder that fits your needs. Look for features like:
- Simple setup with no coding required.
- Secure payment processing.
- Customizable store designs to match your blog’s aesthetic.
- Integration options with WordPress.
Vendroad offers these features and more, making it a perfect choice for WordPress bloggers.
Step 2: Create Your Online Store
- Sign Up: Create an account on vendroad for an easy, but robust online storefront.
- Set Up Your Store: Add your logo, colors, and branding elements. Upload your products or services with images, descriptions, and prices.
- Configure Payments: Link your payment gateway (e.g. Stripe) to accept payments securely.
- Set Up Shipping or Delivery: Define your shipping policies and fees for physical products.
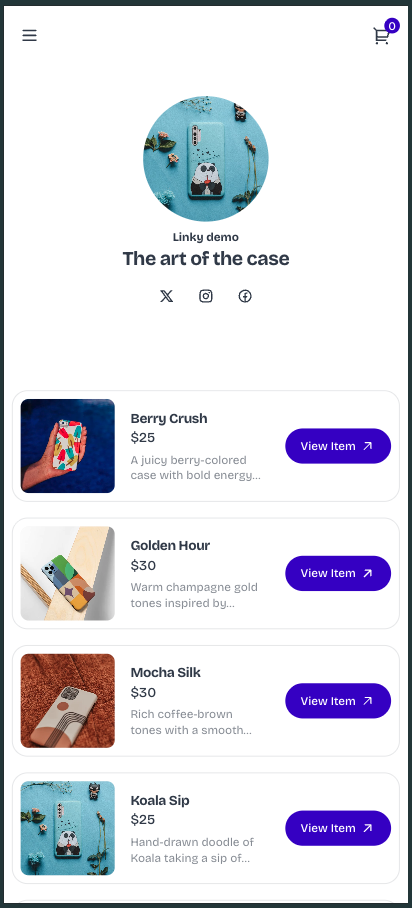
Sample of a Vendroad store
Step 3: Connect Your Store to Your WordPress Blog
You don’t need to overhaul your WordPress blog to integrate an online store. Here’s how to do it:
Option 1: Add a Menu Link to Your Store
- Go to your WordPress dashboard and navigate to Appearance > Menus.
- Add a custom link pointing to your store’s URL (e.g., indiestore.vendry.store).
- Label it as "Shop" or "Store" to make it clear for your visitors.
Option 2: Use a Button or Banner
- Add a prominent call-to-action button or banner on your WordPress blog’s homepage, linking to your store.
- Example: "Check Out My Products" or "Visit My Store"
Step 4: Promote Your Store Through Your Blog
Your WordPress blog is a powerful marketing tool to drive traffic to your store. Here’s how to use it effectively:
- Write Blog Posts About Your Products: Showcase how your products solve a problem or add value. For example, if you sell handmade candles, write a post about the benefits of using eco-friendly candles.
- Add Product Links in Posts: Within your blog content, link directly to relevant products. For example, "Check out our lavender-scented candle here."
- Email Subscribers: If you have a mailing list, announce your new store to your subscribers.
Tips for Success
- Keep Branding Consistent: Match your store’s design with your blog’s theme to create a seamless experience for your visitors.
- Offer Exclusive Deals: Encourage blog readers to visit your store by offering discounts or freebies.
- Monitor Performance: Use your store’s analytics tools to track sales and customer behavior, and adjust your strategies as needed.
- Promote Regularly: Keep your store top of mind by mentioning it in new blog posts and on your social media channels.